Deploying a Simple Node.js Application to AWS EC2 Using Terraform: A Beginner’s Guide
Building projects is one of the best ways to learn Cloud and DevOps. This project aims to help beginners start with AWS and Terraform (Infrastructure as code).
Goal
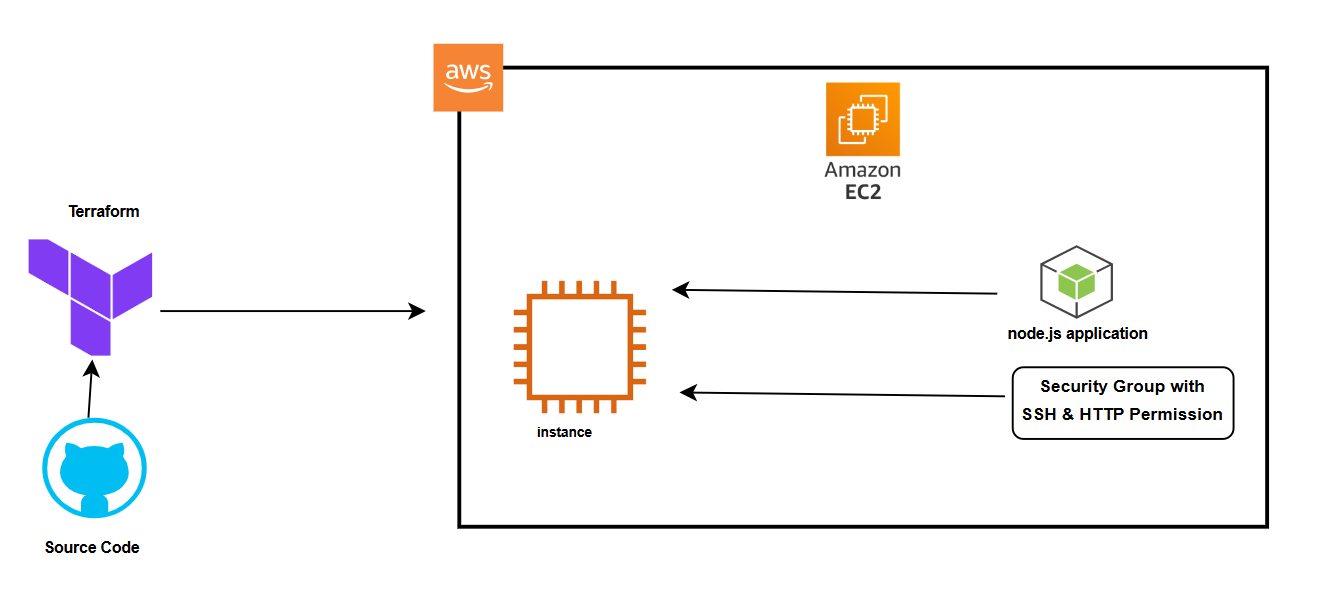
The goal of this article is to guide beginners through the process of deploying a Node.js application to an AWS EC2 instance using Terraform. By the end of this tutorial, you will understand:
- How to Install, write, and execute terraform configurations
- How to set up an IAM role in AWS
- SSH into an AWS server and manually start up a Node.js application.
This article is designed for learners who want a hands-on understanding of how infrastructure as code (IaC) works in practice.
Basic Concepts
1. What is IAM (Identity and Access Management)?
IAM is a service provided by AWS that helps you securely manage access to AWS resources. With IAM, you can:
- Create users and groups to define who can access your resources.
- Assign permissions using policies to determine what actions users or services can perform.
- Leverage roles to securely grant access to AWS services for applications running on your EC2 instances.
IAM ensures that your infrastructure and applications adhere to the principle of least privilege, which enhances security by allowing only the necessary access to resources.
In this project, we’ll follow best practices by avoiding using the root user for AWS services. Instead, we’ll create an IAM user with administrative privileges. This IAM user will have full permissions to manage AWS resources and will serve as the primary account for configuring and deploying infrastructure. Using an IAM user instead of the root account ensures better security and accountability, as it minimizes the risk associated with unrestricted access.
What is Terraform?
Terraform is an open-source infrastructure as code (IaC) tool that enables you to define and manage your infrastructure using declarative configuration files.
Key concepts to know:
- Providers: These plugins let Terraform interact with different cloud platforms (like AWS).
- Resources: These are infrastructure building blocks, such as EC2 instances, IAM roles, or S3 buckets.
- State: Terraform keeps track of your infrastructure’s state in a file, allowing it to compare the actual infrastructure with your configurations and determine what changes to make.
- Variables: These let you make your configuration files reusable and dynamic.
Terraform simplifies the deployment process by automating the creation, updating, and deletion of resources. Instead of manually clicking around in the AWS Management Console, you define everything in code, ensuring consistency and scalability.
Now, let’s get started with the project
Creating an IAM User
If you don’t already have an AWS account, begin by signing up for an AWS Free Tier account. The AWS Free Tier provides enough resources to get started with this project at no cost for most usage. Once your account is set up, log in to the AWS Management Console.
Moving forward, to avoid using the root user for AWS services (a best practice for enhanced security), you’ll need to create an IAM user with administrative privileges. This user will be used for all project-related tasks.
- On the AWS Console homepage, use the search bar to find IAM and navigate to the IAM dashboard.
- Create a User:
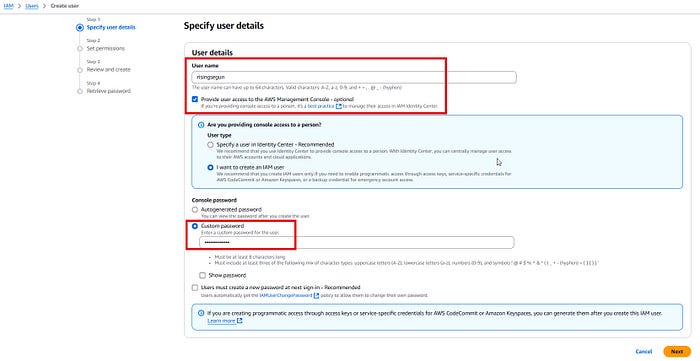
- Click on Users in the left-hand menu, then click on Add User.
- Enter the name of the user. In this tutorial, I used risingsegun
- Choose the AWS Management Console access option and set a password for the new user. You can choose an auto-generated password or create your own
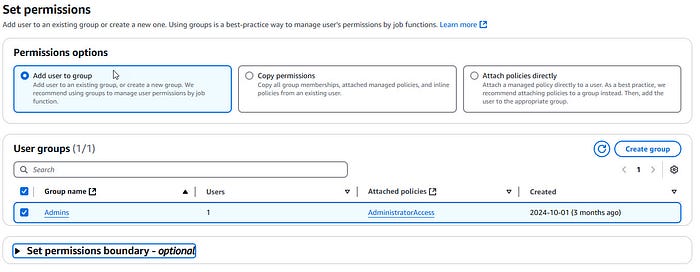
3. Set Permissions:
- On the permissions page, choose the option to attach an existing policy directly.
- Select AdministratorAccess to grant full administrative privileges to the new user.
4. Review and Create:
- Review the details and click Create User.
- Once the user is created, download the provided .csv file. This file contains important information such as the Access Key ID, Secret Access Key, and the Console Sign-In URL. Keep this file secure.
5. Finally, log in with the created user.
Install Terraform
The next step is to install Terraform. The installation process varies depending on the operating system you’re using. For this tutorial, we’ll walk through the steps for installing Terraform on Linux.
Step 1: Update Your System and Install Prerequisites
Before installing Terraform, ensure that your system is up-to-date and that the required packages (gnupg, software-properties-common, and curl) are installed. These packages are necessary for verifying HashiCorp's GPG signature and adding their repository.
Run the following commands:
sudo apt-get update && sudo apt-get install -y gnupg software-properties-common curlStep 2: Add the HashiCorp GPG Key
Download and install the HashiCorp GPG key to verify the package’s authenticity:
bashwget -O- https://apt.releases.hashicorp.com/gpg | \
gpg --dearmor | \
sudo tee /usr/share/keyrings/hashicorp-archive-keyring.gpg > /dev/null
Step 3: Verify the Key’s Fingerprint
Run the following command to verify that the key matches HashiCorp’s fingerprint:
bashCopyEditgpg --no-default-keyring \
--keyring /usr/share/keyrings/hashicorp-archive-keyring.gpg \
--fingerprint
You should see output similar to the following:
scssCopyEdit/usr/share/keyrings/hashicorp-archive-keyring.gpg
-------------------------------------------------
pub   rsa4096 XXXX-XX-XX [SC]
AAAA AAAA AAAA AAAA
uid           [ unknown] HashiCorp Security (HashiCorp Package Signing) <security+packaging@hashicorp.com>
sub   rsa4096 XXXX-XX-XX [E]
Step 4: Add the HashiCorp Repository
Add the official HashiCorp repository to your system. The lsb_release -cs command dynamically detects your distribution's release codename:
echo "deb [signed-by=/usr/share/keyrings/hashicorp-archive-keyring.gpg] \
https://apt.releases.hashicorp.com $(lsb_release -cs) main" | \
sudo tee /etc/apt/sources.list.d/hashicorp.list
Step 5: Update Package Information
Fetch the package information from the HashiCorp repository:
sudo apt updateStep 6: Install Terraform
Now, install Terraform by running:
sudo apt-get install terraformStep 7: Verify Installation
Once installed, verify that Terraform is installed correctly by checking its version:
terraform --versionYou should see output indicating the installed Terraform version.
If you encounter any issues during the installation process, feel free to leave a comment, and I’ll assist you in troubleshooting!
Forking and Cloning the Repository
The next step is to fork the repository simple-node-application to your GitHub account and then clone the forked repository to your local machine.
To fork the repository:
- Open the repository in your browser.
- Click the Fork button on the top-right corner of the page.
- Select your GitHub account as the destination.
Once you’ve forked the repository, clone it by running:
git clone https://github.com/your-github-username/simple-node-application.gitReplace your-github-username with your actual GitHub username. Don’t forget to star the repository to show your support!
Modifying the Terraform Configuration
Navigate to the Terraform configuration folder in the forked repository:
cd simple-node-application/terraformOpen the main.tf file in a text editor. This file contains the Terraform configuration, including the resources to be provisioned. Let's break it down:
Terraform Configuration
The terraform block specifies the required providers. In this case, we use the AWS provider, with version ~> 5.0.
terraform {
  required_providers {
    aws = {
      source  = "hashicorp/aws"
      version = "~> 5.0"
    }
  }
}
AWS Provider
The AWS provider block configures Terraform to connect to AWS using the specified region, access key, and secret key.
provider "aws" {
  region     = "us-east-1"
  access_key = var.aws_access_key
  secret_key = var.aws_secret_key
}
The access_key and secret_key values reference variables defined in a separate file or passed through environment variables for security.
Resources
We define two resources:
- AWS EC2 Instance
This block creates an EC2 instance using the specified Amazon Linux 2 AMI and attaches a user data script to install Node.js and the application:
resource "aws_instance" "web_server" {
  ami           = "ami-0df8c184d5f6ae949" # Update with your own AMI ID
  instance_type = "t2.micro"
  key_name      = var.key_name

  user_data = <<-EOF
    #!/bin/bash
    yum update -y
    yum install -y git
    curl -sL https://rpm.nodesource.com/setup_16.x | bash -
    yum install -y nodejs
    git clone https://github.com/your-github-username/simple-node-application.git /home/ec2-user/simple-node-application
    cd /home/ec2-user/simple-node-application/app
    npm install
  EOF
}
Note: Update
amiwith your Amazon Linux 2 AMI ID and replace the GitHub URL with your forked repository.
- AWS Security Group
This block creates a security group to allow HTTP (port 3000) and SSH (port 22) access
resource "aws_security_group" "web_sg" {
  name_prefix = "web-sg-"ingress {
    from_port   = 3000
    to_port     = 3000
    protocol    = "tcp"
    cidr_blocks = ["0.0.0.0/0"]
  }ingress {
    from_port   = 22
    to_port     = 22
    protocol    = "tcp"
    cidr_blocks = ["0.0.0.0/0"]
  }egress {
    from_port   = 0
    to_port     = 0
    protocol    = "-1"
    cidr_blocks = ["0.0.0.0/0"]
  }
}
Securing Secrets with Environment Variables
It is not a security best practice to hardcode sensitive information like AWS credentials in your Terraform files. Instead, use environment variables to store secrets securely.
Run the following commands to set environment variables for your AWS credentials and SSH key:
export TF_VAR_aws_access_key="your-access-key"
export TF_VAR_aws_secret_key="your-secret-key"
export TF_VAR_key_name="your-ssh-key"- Replace
your-access-keyandyour-secret-keywith the AWS credentials from the CSV file downloaded earlier. - Replace
your-ssh-keywith the name of your SSH key.
To find the correct Amazon Linux 2 AMI ID, navigate to the AWS Management Console, search for EC2, and locate the AMI details of your chosen server.
Defining Variables and Outputs
Inside the Terraform folder, create a variables.tf file to define the variables used in main.tf:
variable "aws_access_key" {}
variable "aws_secret_key" {}
variable "key_name" {}
Create an outputs.tf file to define outputs, such as the instance's public IP:
output "instance_public_ip" {
  value = aws_instance.web_server.public_ip
}
Provisioning Infrastructure with Terraform
Now that everything is set up, let’s provision the infrastructure:
- Initialize Terraform
Runterraform initto initialize the working directory and download the required providers:
terraform init2. Inspect the Execution Plan
Run terraform plan to generate and review the execution plan, which shows what Terraform will do:
terraform plan3. Apply the Configuration
Run terraform apply to apply the changes and create the resources:
terraform applyType yes when prompted to confirm the changes.
Verifying the Deployment
Once Terraform completes the deployment, note the public IP address of the EC2 instance from the output. You can SSH into the instance to verify the application:
ssh -i your-ssh-key.pem ec2-user@instance-public-ipReplace your-ssh-key.pem and instance-public-ip with the actual values.
With this setup, you now have an EC2 instance running a simple Node.js application. Let me know if you’d like help troubleshooting any step!